Implementing an Electronic Lab Notebook (ELN) in a New Lab: A Step-by-Step Guide

Set up your new lab with a practical ELN rollout plan that protects data integrity, improves access to research records, and helps PIs and scientists adopt paperless workflows from the start.

July 6, 2026
()
min read
A laboratory

Download Whitepaper

By submitting this form, you agree with our Privacy Policy.
Thank you! Download the file by clicking below:
Download
Oops! Something went wrong while submitting the form.

Table of Contents

Thank you! Your submission has been received!
Oops! Something went wrong while submitting the form.

Table of Contents

TL;DR

A new lab should set up its electronic lab notebook (ELN) before experiments begin, because the first records you create become the foundation for how your team structures projects, traces samples, controls protocol versions, and trusts research later.

  • Design before day one.
    In a new lab, every early decision sets a precedent. Defining folder structure, naming conventions, sample IDs, and protocol versions before benchwork starts prevents the scattered mix of shared-drive PDFs, standalone freezer spreadsheets, and paper notebooks that teams later struggle to reconcile. The aim is making the correct workflow the easiest one.
  • Map workflows, not features.
    Before comparing products, document what each workflow must capture: experiment types, samples, reagents, equipment, protocol or standard operating procedure (SOP) versions, supporting files, and search metadata. Sample-dependent labs should connect experiment records with inventory or a laboratory information management system (LIMS) early, as SciSure does by pairing its ELN with LIMS.
  • Build for compliance.
    Configure controls to match current data expectations even if your lab is unregulated today. Some relevant standards include the NIH Data Management and Sharing Policy, the FAIR Principles, 21 CFR Part 11 for electronic records and signatures, 21 CFR Part 58 Good Laboratory Practice, and FDA's 2024 guidance on electronic systems in clinical investigations.
  • Structure samples and templates.
    Set a clear hierarchy of group, project, study, and experiment, then define storage units, sample types, required metadata, and barcodes before go-live. Turn recurring experiments into templates with linked samples and controlled protocol versions. Searchable, barcoded inventory gives scientists a reason to trust the record instead of memory or side spreadsheets.
  • Control access, prove adoption.
    Decide who can create, edit, sign, or witness records, then enable digital signatures, witness approvals, audit trails, and single sign-on (SSO) before rollout. Track active users, template use, and retired paper forms across the first 90 days. Labs like OHSU's Fugolin Lab and Food Brewer onboarded faster by building this structure early.


This post was originally published in 2023 and has been updated to reflect current research data expectations, electronic recordkeeping standards, SciSure's implementation process, and research-focused customer examples.

Starting a new lab gives you a rare advantage: you can design your research recordkeeping before habits, folders, freezer maps, and paper notebooks become hard to change.

Does that mean necessarily switching to an electronic lab notebook (ELN) from day one? Not necessarily. Setting up a new lab is difficult enough and you do need a practical implementation strategy. With an ELN in the mix, you also need clear project structure, searchable metadata, sample traceability, protocol control, permissions, review workflows, training, and a plan for how paperless work will become the daily default.

At the same time, a good ELN implementation helps your team answer these simple but critical questions:

  • Where should this experiment live?
  • Which protocol version was used?
  • Which sample, reagent lot, instrument, or file supports the result?
  • Who entered or changed the record?
  • Can another scientist find, understand, repeat, and review the work later?

If that's the kind of lab you'd like to build, keep reading.

Why should a new lab implement an ELN before experiments start?

A new lab should implement an ELN before experiments start because the first records you create become the foundation for how your team searches, repeats, reviews, and trusts research later.

In a new lab, every early decision becomes a precedent. If your first postdoc creates one folder structure, your lab manager creates a separate freezer spreadsheet, or the new grad student stores protocol changes in shared-drive PDFs, you (the beleagured PI) have already started building the disconnected system you were trying to avoid.

An ELN gives you a cleaner starting point. You can define how research should be captured before the lab becomes busy:

  • A protein engineering team can decide how constructs, plasmids, sequencing files, expression conditions, and assay results will connect.
  • A cell culture lab can standardize passage records, freezer locations, media lot numbers, contamination checks, and protocol versions.
  • A materials science lab can connect synthesis conditions, reagent batches, instrument files, curing parameters, and characterization images.
  • A translational research group can define which studies need review, signatures, sample lineage, and controlled access.

The goal is to make the right workflow the easiest workflow. Your scientists should not have to decide from scratch where to store each result, which sample ID to use, or which protocol version is current.

SciSure
Build your paperless foundation before the first experiment
With SciSure, you can connect experiments, samples, inventory, protocols, permissions, signatures, and audit trails before your lab's workflows become scattered.
Request a demo

How do you implement a paperless lab environment while protecting data integrity, accessibility, and user adoption?

To implement a paperless lab environment, define the record model, configure integrity controls, make records searchable, train users through real workflows, and retire paper only after each priority workflow is working reliably in the ELN.

Use this practical sequence:

What to define before setting up a 'paperless' lab & why

Your lab requirement What to define before go-live Why it matters
Data integrity Permissions, audit trails, signatures, timestamps, protocol version control, sample history, retention rules Helps your team trust who did what, when, and under which approved workflow
Accessibility Project hierarchy, naming conventions, metadata fields, sample links, storage locations, file attachment rules, search filters Helps scientists find prior experiments, samples, protocols, and supporting files without asking the original person
User adoption Key users, templates, role-based training, pilot workflow, support process, feedback loop Helps scientists use the ELN as part of normal bench work rather than as an extra documentation step
Compliance readiness Review workflow, locked records, controlled access, SOP alignment, export needs, archive process Helps regulated or audit-sensitive teams retrieve evidence without rebuilding a timeline from emails and files
Reproducibility Experiment templates, protocol libraries, required fields, sample lineage, equipment sections, attachment expectations Helps another scientist understand and repeat the work later

A paperless lab is successful when the ELN becomes the source of research context. That means scientists can create an experiment, link samples, attach images or instrument output, use the approved protocol, request review, and retrieve the record later without maintaining a parallel notebook or spreadsheet.

What should you decide before choosing an ELN for a new lab?

Before choosing an ELN, decide what your lab must document, what data needs to stay traceable, who needs access, and which workflows need structure from day one. Avoid evaluating ELNs only through a generic feature checklist. Start with your lab's actual research model. For each major workflow, document:

  • The experiment type or process name.
  • The samples, reagents, consumables, and equipment involved.
  • The protocol or SOP version.
  • The files that support the record, such as images, spreadsheets, instrument exports, scripts, or analysis outputs.
  • The metadata scientists will need for search later.
  • The people who create, review, approve, sign, witness, archive, or reuse the record.
  • The systems that may need to connect now or later, such as instruments, identity providers, data repositories, inventory systems, or analysis tools.

Then turn those details into requirements.

What to consider before implementing an ELN in your lab

Workflow need ELN implementation decision
Scientists run the same assay every week Build an experiment template with required sections, fields, sample links, and expected attachments
Samples need to be traceable from creation to use Standardize sample types, storage locations, barcodes, parent-child relationships, and sample history
Protocols will change over time Use controlled protocol naming, labels, permissions, versioning, and sign-off rules
Work supports publications, grants, IP, or regulatory review Add metadata for grant IDs, collaboration agreements, publication identifiers, DOI references, review status, and retention
Multiple teams or collaborators need access Define groups, projects, studies, collaborators, permissions, and external access rules early
The lab wants to go paperless Define when paper is no longer the authoritative record and how legacy notes, instrument printouts, or wet signatures will be handled

If your lab depends heavily on samples, choose an ELN strategy that connects experiment documentation with LIMS or inventory workflows. For example, SciSure ELN supports experiment documentation and collaboration, while SciSure LIMS supports samples, inventory, equipment, storage locations, workflows, and traceability.

What regulatory and research standards should shape your ELN setup?

Your ELN setup should reflect current expectations for data integrity, electronic records, reproducibility, data sharing, and audit readiness, even if your lab is not formally regulated today.

For research labs, here are some relevant standards and expectations:

  • The NIH Data Management and Sharing Policy, which NIH describes as part of responsible data management and sharing. For NIH-funded labs, this matters because data management plans now influence how scientific data is organized, preserved, shared, and accessed.
  • The FAIR Principles, which focus on making data findable, accessible, interoperable, and reusable. This matters because ELN metadata, sample links, persistent identifiers, controlled vocabularies, and searchable repositories all affect whether research can be reused later.
  • 21 CFR Part 11, which covers electronic records and electronic signatures for FDA-regulated contexts. This matters when electronic lab records, signatures, access controls, and audit trails need to be trustworthy and reliable.
  • FDA's October 2024 guidance on electronic systems, electronic records, and electronic signatures in clinical investigations, which explains how FDA views electronic systems, electronic records, and electronic signatures in clinical investigations.
  • 21 CFR Part 58, which covers Good Laboratory Practice for nonclinical laboratory studies submitted to FDA. It matters for labs generating nonclinical safety data because the rule emphasizes quality and integrity of safety data, SOPs, equipment records, raw data, storage, retrieval, and retention.
  • FDA's Data Integrity and Compliance With Drug CGMP guidance, which is useful for regulated manufacturing and quality environments because FDA expects data to be reliable and accurate.

For a new lab, you don't need to overbuild controls that do not apply. You do, however, need to make conscious choices. If your lab might later support IND-enabling studies, GLP work, GxP manufacturing, clinical investigations, sponsored research, or IP-heavy collaborations, configure the ELN so records can support those expectations before you need them.

How should you structure the ELN for a new lab?

Structure the ELN around how your lab will organize real work: group, project, study, experiment, protocol, sample, storage unit, equipment, and collaborator access. Here's an example from how we implement an ELN at SciSure; we start by defining:

  • Group
    The working environment for the lab or team.
  • Project
    The space where team-based, grant-based, program-based, or product-based work is stored.
  • Study
    A subfolder within a project for related experimental records.
  • Experiment
    The research record itself.

That hierarchy helps a new lab avoid scattered records. Before your team starts creating experiments, decide how the structure should map to daily work. For example:

Project and study structure by lab type

Lab type Project structure Study structure
Academic PI lab Grant, research theme, collaboration, or trainee project Specific aim, manuscript figure set, model system, or assay family
Biotech startup Program, target, product candidate, or platform workflow Screening campaign, validation study, process condition, or assay package
Core facility Service line, customer group, instrument platform, or method Intake batch, project request, run series, or report cycle
Translational team Disease area, cohort, collaboration, or study protocol Sample collection phase, assay phase, analysis batch, or review package

Make sure you choose naming conventions scientists can follow without guessing. A useful name usually includes a project or study ID, a short descriptive label, a date or year where helpful, and owner initials only when ownership matters. (And not, for example, "Version 15_final_FINAL" or "Matt's notebook.")

With SciSure, you can use project and study custom fields to capture context such as grant IDs, material transfer agreements, collaboration agreements, publication identifiers, or DOI information. This makes records easier to find later when you need to support a grant report, manuscript, audit, IP review, or collaborator handoff.

How do you configure inventory and samples before the lab gets busy?

Configure inventory and samples before go-live by defining storage locations, sample types, required metadata, barcodes, and sample search rules.

In a new lab, inventory setup is often treated as a lab-manager task that can wait. That's a mistake if your experiments depend on sample traceability. Once people start writing sample IDs on tubes, creating freezer maps in spreadsheets, and naming aliquots by memory, cleanup gets harder.

Set up inventory in this order:

  1. Define storage units and naming conventions.
  2. Create storage-unit templates for freezers, fridges, shelves, racks, boxes, drawers, or liquid nitrogen storage.
  3. Standardize compartment layers, such as shelf, rack, box, position, tower, or drawer.
  4. Define sample types, such as plasmid, protein, cell line, antibody, compound, tissue, DNA, RNA, environmental sample, control, or reference material.
  5. Add required fields, optional fields, dropdowns, validation rules, and units.
  6. Decide where barcodes or external IDs fit.
  7. Import starting inventory and test search.
  8. Train users to create, move, check, update, and link samples.

With SciSure's Inventory Browser, you can see storage location, storage compartment, sample lists, and sample information in one view. SciSure sample search can use stored sample information across default and custom fields, so you can save and share filter templates for repeat searches such as expired samples, checked-out materials, or a specific sample type in a specific freezer.
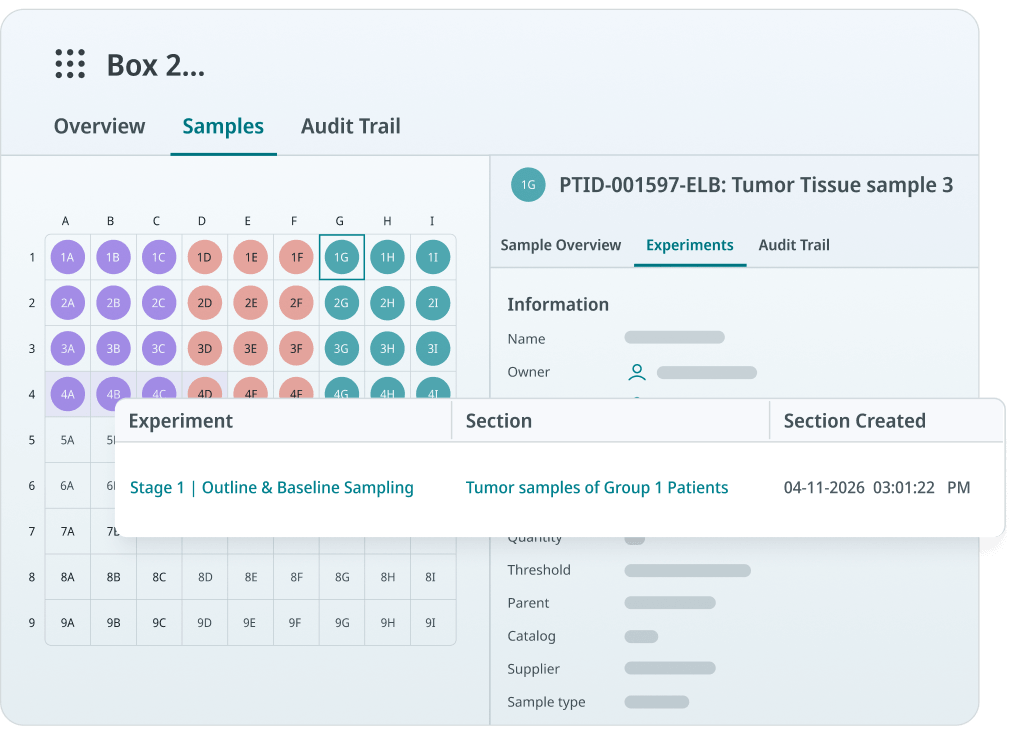
SciSure Inventory Management

That's where paperless work becomes practical. If a scientist can find a tube, see its storage location, confirm its metadata, and link it to an experiment, they have a reason to trust the system.

How should you set up templates and protocols?

You should set up templates and protocols by turning your expected recurring workflows into structured records with required sections, linked samples, controlled protocol versions, expected files, and review steps.

Templates are one of the strongest adoption tools in a new lab. They reduce blank-page anxiety and help new team members document work consistently from the beginning.

For each recurring workflow, define:

  • The purpose of the experiment.
  • Required background or hypothesis fields.
  • Required sample, reagent, equipment, and condition fields.
  • Protocol or SOP link.
  • Expected attachments, such as microscopy images, instrument exports, analysis files, spreadsheets, or scripts.
  • Results and interpretation sections.
  • Review, signing, witnessing, or approval rules.
  • Metadata needed for search, reporting, or publication later.

With SciSure, you can create experiment templates from scratch or created from an existing experiment. That matters for a new lab because your first well-structured experiments can become reusable templates. You can refine the first few strong records, remove one-off details, and turn them into the standard workflow for the team.
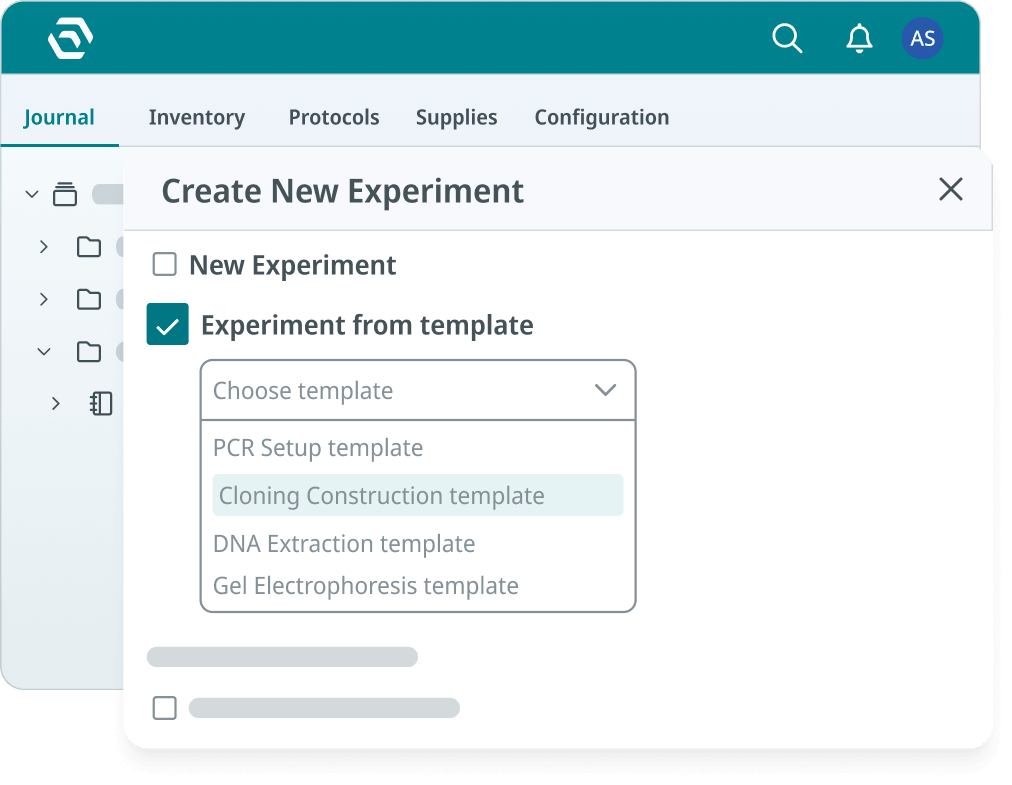
SciSure experimental template

You should also treat protocols as controlled research assets. A new team member should know which protocol version to use, what fields are required, who can update the protocol, and whether review or signature is needed before a protocol becomes active.

This is where reproducibility becomes concrete. A scientist can follow a current protocol, link the correct sample, capture the right conditions, attach the expected files, and create a record another person can understand months later.

SciSure
Planning the digital foundation for a new lab?
Talk to a SciSure specialist about implementation planning, ELN/LIMS structure, sample traceability, and user training before your first major study begins.
Request a demo

How should permissions, signatures, and audit trails be configured?

Configure permissions, signatures, and audit trails before broad rollout so scientists know what they can do, managers can protect shared records, and reviewers can trust completed work.

Permissions are part of lab design. If everyone can edit everything, data integrity suffers. If permissions are too restrictive, adoption suffers. A new lab needs a model that fits how work happens.

Here's what a practical permissions model should define:

  • Who can create, edit, delete, archive, or restore experiments.
  • Who can create or edit templates.
  • Who can create, update, move, or archive samples.
  • Who can manage storage units, sample types, and equipment.
  • Who can publish or update protocols.
  • Who can review, sign, or witness records.
  • Who can view sensitive projects, confidential collaborations, or IP-relevant work.
  • How records remain accessible when trainees, contractors, or employees leave.

With SciSure, you can sign experiments and lock them into read-only mode with a visible digital signature and timestamp. If you enable witness signing, a witness can approve and sign, or decline and unlock the record with a note so the creator can adjust and resubmit. SciSure sample audit trails show who changed sample information, when the change was made, and what data was modified.
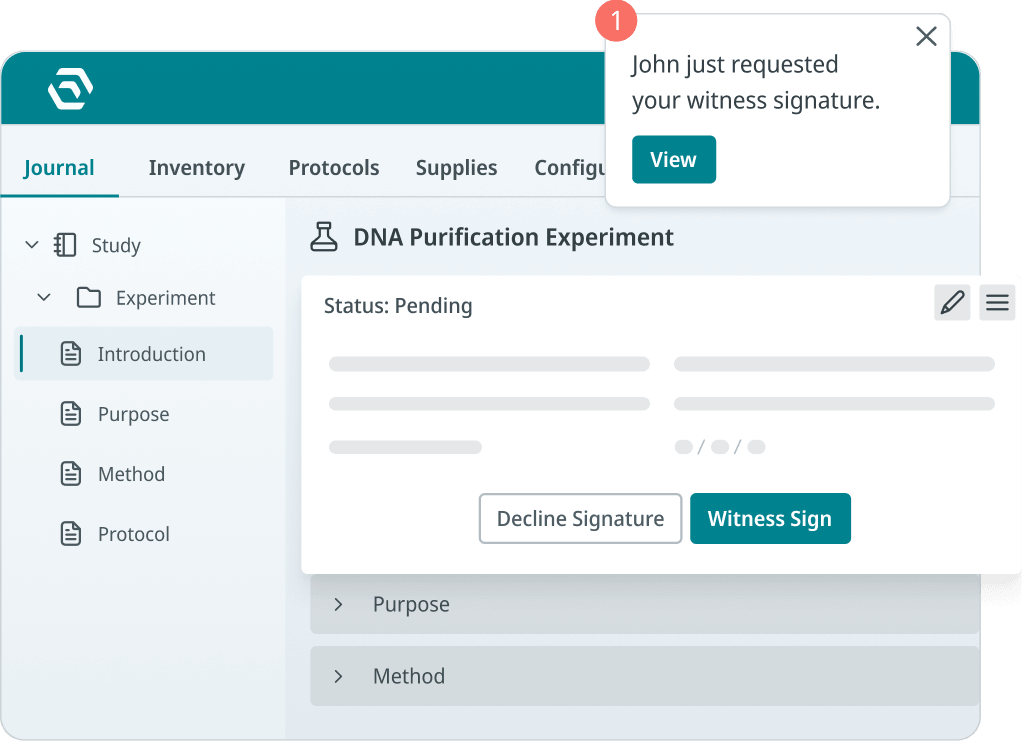
SciSure ELN witness signing

For identity and access management, SciSure also supports SAML single sign-on in supported configurations, including Microsoft Entra ID, AD FS, Okta, OneLogin, Keycloak, and SimpleSAMLphp.

Even if your lab is not regulated, these controls help answer the same practical question: can your team trust the record later?

What should the first 90 days of ELN implementation look like?

Your first 90 days should move from design to configuration to active adoption, with a small number of workflows fully working before the lab scales.

First 90 days of ELN Implementation in a new lab

Timeline What to complete
Days 1–30 Name implementation owners, define the lab structure, choose priority workflows, draft naming conventions, define sample types, identify required metadata, and choose key users
Days 31–60 Configure groups, projects, studies, templates, protocols, storage units, sample types, permissions, signatures if needed, and initial inventory
Days 61–90 Train users through real tasks, run pilot experiments, test sample search, review completed records, collect friction points, update templates, and retire duplicate paper or spreadsheet steps

Make sure to stick to specific success metrics. For example:

  • Number of active users creating complete experiment records.
  • Number of recurring workflows converted into templates.
  • Percentage of priority samples with required metadata and storage location.
  • Number of protocols under version control.
  • Average time to find a sample, protocol, or prior experiment.
  • Number of support issues by category, such as permissions, templates, inventory, training, or search.
  • Percentage of completed records reviewed, signed, witnessed, or archived according to policy.
  • Number of side spreadsheets or paper forms retired.

If your scientists are still maintaining those "sneaky" side spreadsheets even after go-live, treat it as evidence. Ask what the spreadsheet does that the ELN workflow does not yet do: a missing field, report, filter, batch update, label workflow, permission, or habit.

How can SciSure's implementation process support a new lab?

SciSure can support a new lab through onboarding, implementation planning, technical implementation, data migration, user training, support resources, and ongoing customer success. Our Customer Success roadmap includes an implementation path that starts with assembling a project team, creating a project plan, setting clear milestones, appointing key users, and creating a training schedule. For private cloud and on-premises examples, this also includes technical implementation, optional test migration on an acceptance environment, migration to the new environment, and training for key users, group administrators, and end users.

A solid implementation process matters because a new lab needs more than software access. Your team needs to learn how to complete actual research work in the system. Like for example, how to:

  • Create an experiment from a template.
  • Link a sample and record where it is stored.
  • Use the active protocol version.
  • Attach a microscopy image, instrument output, spreadsheet, or analysis file.
  • Search for prior work.
  • Update sample metadata.
  • Request review.
  • Sign or witness where required.
  • Retrieve the record for a grant report, publication, IP review, audit, or collaboration.

With SciSure, the implementation process can help connect these decisions across ELN, LIMS, samples, inventory, protocols, permissions, signatures, audit trails, integrations, support resources, and training. The software matters, but the implementation process is what turns the software into a working lab system.

What does a successful new-lab implementation look like in practice?

A successful new-lab implementation looks like a team that can onboard new researchers quickly, keep experiments consistent, trace samples and protocols, and find records without relying on paper notebooks or memory. For example, Dr. Ana Paula Piovezan Fugolin implemented SciSure immediately when founding the lab, so the team started with connected data, protocols, and inventory rather than trying to retrofit structure later.

That mattered because the OHSU Fugolin Lab operates in a multidisciplinary, training-rich academic environment with postdoctoral fellows, graduate students, dental students, and research staff. The lab needed a way to keep experimental data, chemical batches, protocols, images, and results accessible and traceable as people joined, trained, and collaborated.

In a nutshell: when a new lab starts with a structured ELN and inventory system, onboarding becomes part of the workflow. New trainees can follow standardized protocols, find prior work, understand what was done and by whom, and avoid depending on informal handoffs.
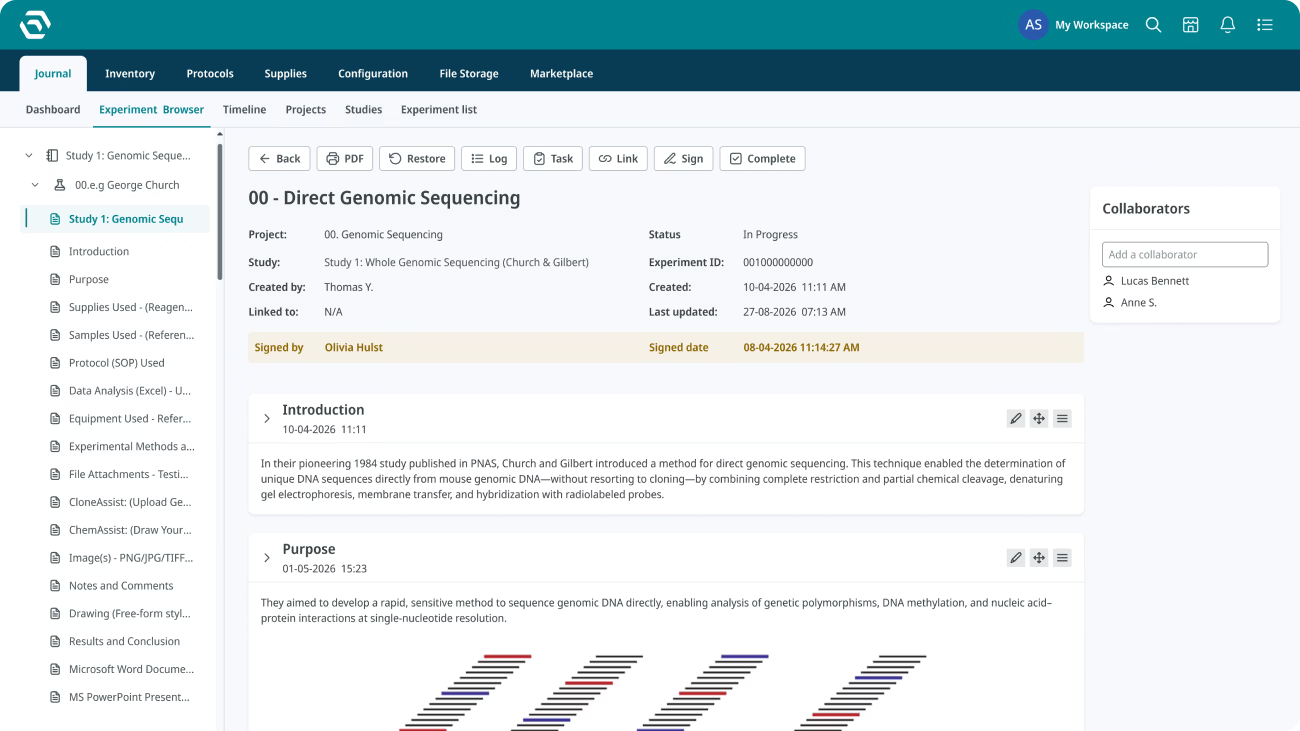
Likewise, Food Brewer's story shows what can happen when a growth-stage research organization builds digital infrastructure early. Food Brewer selected SciSure as its digital lab platform and began implementation with standardized naming conventions, project and experiment hierarchy, comprehensive barcoding, sample traceability, automation, and data integration. The company reported a 60% productivity increase in R&D and a 40% productivity increase in upstream processing, along with faster onboarding and stronger regulatory and IP documentation.

Food Brewer: R&D and Upstream Processing at Scale
Customer outcomes

Food Brewer: R&D and Upstream Processing at Scale

Less manual tracking, full sample traceability, and automation that scaled cultivated cocoa research from tissue selection to 2,500-liter bioreactors.

After implementing SciSure to unify data, samples, and processes:

40%-60% productivity gains

  • R&D productivity up 60%
  • Upstream processing up 40%
  • Full traceability across cultures, chemicals, and equipment
  • Faster onboarding and stronger regulatory and intellectual property documentation

Sources

SciSure customer story: Food Brewer, "Food Brewer scales cultivated cocoa research with SciSure." Metrics are condensed from that story.

These examples point to the same implementation principle: the highest-value ELN setup helps scientists do real work consistently, find information quickly, and trust the record later.

How do you train users without slowing down the lab?

Train users by role and workflow so each person learns how to complete the work they already need to do. New labs often onboard people in waves: the PI or lab head, early lab manager, first scientists, trainees, contractors, collaborators, and later operations or QA stakeholders. Each group needs a different training path.

Here are some hands-on scenarios to help you get an idea of where to begin:

  • A scientist creates an experiment from a template, links samples, attaches data, and submits the record for review.
  • A lab manager adds a sample type, creates storage locations, imports samples, prints or applies labels, and verifies search filters.
  • A reviewer checks an experiment, confirms protocol version and attachments, and signs or witnesses if required.
  • An admin adds a user, assigns permissions, and confirms the user can access the right projects and samples.
  • A key user collects questions, identifies missing fields or confusing templates, and updates the rollout plan.

Keep training close to the pilot workflow. A cell culture team might practice passage records, freezer locations, media lots, contamination checks, and protocol versions. A protein engineering team might practice construct documentation, plasmid links, sequencing files, assay attachments, and review steps. A core facility might practice sample intake, storage assignment, status updates, and report retrieval.

Adoption improves when the first training session feels like doing real work, not watching a software tour.

How do you know your new lab's ELN implementation is working?

Your ELN implementation is working when scientists use the system for active work, samples are searchable, protocols are controlled, records are reviewable, and paper or spreadsheet workarounds start disappearing. Look out for signs like these:

  • Your scientists are creating new experiments from templates instead of blank pages or copied Word files.
  • You can search for samples by ID, sample type, owner, storage location, barcode, or custom metadata.
  • You can reuse protocols from controlled versions rather than copied from old PDFs.
  • You can attach expected images, instrument files, analysis files, and notes in the record.
  • Reviewers can see who changed what, when, and why.
  • New team members can follow a workflow without needing a private walkthrough from one person.
  • Lab managers can answer inventory questions without opening separate freezer maps.
  • PIs or project leads can find enough context to understand progress across projects.
  • Compliance, QA, grant, or IP stakeholders can retrieve evidence without reconstructing the story from email.

The best sign is ordinary confidence. A scientist knows where to record work. A lab manager knows where materials are. A reviewer can trust the history. A new teammate can learn the workflow without inheriting a pile of paper and guesses.

SciSure
Ready to build a paperless lab your team can actually use?
With SciSure, you can connect ELN, LIMS, inventory, protocols, permissions, signatures, and audit trails, so your lab starts with structured, searchable workflows from day one.
Request a demo

FAQ: implementing an ELN in a new lab

Should a new lab implement an ELN before hiring the full team?

Yes, if you can. Implementing the ELN early lets the first users define structure, templates, sample types, storage locations, and permissions before the lab grows. You can refine the setup as the team expands, but the foundation should be in place before recordkeeping habits become scattered.

What should a new lab configure first?

Start with the lab hierarchy, naming conventions, permissions, priority workflows, experiment templates, protocols, sample types, storage units, and required metadata. If your research depends on samples, configure inventory before experiments begin.

How do you avoid making the ELN too complicated?

Start with the workflows that happen every week. Keep required fields focused on the metadata people actually need to find, repeat, review, or report the work. Add complexity only when it solves a real traceability, compliance, or retrieval problem.

When can a lab stop using paper notebooks?

A lab can stop using paper notebooks once the ELN workflow is approved, users are trained, records are complete, review or signature needs are covered, and paper is no longer needed as the authoritative record under the lab's policy. Regulated or institutionally governed labs should confirm this with QA, legal, compliance, or research administration.

What is the biggest risk when going paperless?

The biggest risk is losing context. A digital note is weak if it is separated from the sample, protocol version, file attachment, reviewer, timestamp, storage location, or decision trail that explains the work.

Who should own ELN implementation in a new lab?

Use a small implementation team. Include the PI or scientific lead, lab manager or lab operations owner, IT or systems owner, QA or compliance stakeholder if relevant, and key users who understand daily bench work.

How do you encourage scientists to adopt the ELN?

Give scientists templates that match their work, make sample lookup easier, train through real experiments, respond quickly to friction, and remove duplicate paper or spreadsheet steps once the ELN workflow works. Adoption improves when the system saves time or reduces confusion in the work people already do.

How should a new lab measure ELN success?

Track active users, completed experiments, template usage, searchable samples, protocol reuse, support questions, review or signature completion, time to find records, and the number of retired side spreadsheets or paper forms.

If you're building a new lab, your ELN implementation is one of the earliest operational decisions that will shape how your science gets recorded, found, repeated, reviewed, and trusted. The sooner you define the structure, the easier it is to build a paperless lab that scientists will actually use.

If this sounds like the kind of lab you'd like to build, get in touch with us and let's get those first 90 days going.

Read More:

Ready to see SciSure in action?

Get a personalized demo and see how SciSure fits your lab's workflows.
Request demo

No commitment · Free consultation

Starting a new lab gives you a rare advantage: you can design your research recordkeeping before habits, folders, freezer maps, and paper notebooks become hard to change.

Does that mean necessarily switching to an electronic lab notebook (ELN) from day one? Not necessarily. Setting up a new lab is difficult enough and you do need a practical implementation strategy. With an ELN in the mix, you also need clear project structure, searchable metadata, sample traceability, protocol control, permissions, review workflows, training, and a plan for how paperless work will become the daily default.

At the same time, a good ELN implementation helps your team answer these simple but critical questions:

  • Where should this experiment live?
  • Which protocol version was used?
  • Which sample, reagent lot, instrument, or file supports the result?
  • Who entered or changed the record?
  • Can another scientist find, understand, repeat, and review the work later?

If that's the kind of lab you'd like to build, keep reading.

Why should a new lab implement an ELN before experiments start?

A new lab should implement an ELN before experiments start because the first records you create become the foundation for how your team searches, repeats, reviews, and trusts research later.

In a new lab, every early decision becomes a precedent. If your first postdoc creates one folder structure, your lab manager creates a separate freezer spreadsheet, or the new grad student stores protocol changes in shared-drive PDFs, you (the beleagured PI) have already started building the disconnected system you were trying to avoid.

An ELN gives you a cleaner starting point. You can define how research should be captured before the lab becomes busy:

  • A protein engineering team can decide how constructs, plasmids, sequencing files, expression conditions, and assay results will connect.
  • A cell culture lab can standardize passage records, freezer locations, media lot numbers, contamination checks, and protocol versions.
  • A materials science lab can connect synthesis conditions, reagent batches, instrument files, curing parameters, and characterization images.
  • A translational research group can define which studies need review, signatures, sample lineage, and controlled access.

The goal is to make the right workflow the easiest workflow. Your scientists should not have to decide from scratch where to store each result, which sample ID to use, or which protocol version is current.

SciSure
Build your paperless foundation before the first experiment
With SciSure, you can connect experiments, samples, inventory, protocols, permissions, signatures, and audit trails before your lab's workflows become scattered.
Request a demo

How do you implement a paperless lab environment while protecting data integrity, accessibility, and user adoption?

To implement a paperless lab environment, define the record model, configure integrity controls, make records searchable, train users through real workflows, and retire paper only after each priority workflow is working reliably in the ELN.

Use this practical sequence:

What to define before setting up a 'paperless' lab & why

Your lab requirement What to define before go-live Why it matters
Data integrity Permissions, audit trails, signatures, timestamps, protocol version control, sample history, retention rules Helps your team trust who did what, when, and under which approved workflow
Accessibility Project hierarchy, naming conventions, metadata fields, sample links, storage locations, file attachment rules, search filters Helps scientists find prior experiments, samples, protocols, and supporting files without asking the original person
User adoption Key users, templates, role-based training, pilot workflow, support process, feedback loop Helps scientists use the ELN as part of normal bench work rather than as an extra documentation step
Compliance readiness Review workflow, locked records, controlled access, SOP alignment, export needs, archive process Helps regulated or audit-sensitive teams retrieve evidence without rebuilding a timeline from emails and files
Reproducibility Experiment templates, protocol libraries, required fields, sample lineage, equipment sections, attachment expectations Helps another scientist understand and repeat the work later

A paperless lab is successful when the ELN becomes the source of research context. That means scientists can create an experiment, link samples, attach images or instrument output, use the approved protocol, request review, and retrieve the record later without maintaining a parallel notebook or spreadsheet.

What should you decide before choosing an ELN for a new lab?

Before choosing an ELN, decide what your lab must document, what data needs to stay traceable, who needs access, and which workflows need structure from day one. Avoid evaluating ELNs only through a generic feature checklist. Start with your lab's actual research model. For each major workflow, document:

  • The experiment type or process name.
  • The samples, reagents, consumables, and equipment involved.
  • The protocol or SOP version.
  • The files that support the record, such as images, spreadsheets, instrument exports, scripts, or analysis outputs.
  • The metadata scientists will need for search later.
  • The people who create, review, approve, sign, witness, archive, or reuse the record.
  • The systems that may need to connect now or later, such as instruments, identity providers, data repositories, inventory systems, or analysis tools.

Then turn those details into requirements.

What to consider before implementing an ELN in your lab

Workflow need ELN implementation decision
Scientists run the same assay every week Build an experiment template with required sections, fields, sample links, and expected attachments
Samples need to be traceable from creation to use Standardize sample types, storage locations, barcodes, parent-child relationships, and sample history
Protocols will change over time Use controlled protocol naming, labels, permissions, versioning, and sign-off rules
Work supports publications, grants, IP, or regulatory review Add metadata for grant IDs, collaboration agreements, publication identifiers, DOI references, review status, and retention
Multiple teams or collaborators need access Define groups, projects, studies, collaborators, permissions, and external access rules early
The lab wants to go paperless Define when paper is no longer the authoritative record and how legacy notes, instrument printouts, or wet signatures will be handled

If your lab depends heavily on samples, choose an ELN strategy that connects experiment documentation with LIMS or inventory workflows. For example, SciSure ELN supports experiment documentation and collaboration, while SciSure LIMS supports samples, inventory, equipment, storage locations, workflows, and traceability.

What regulatory and research standards should shape your ELN setup?

Your ELN setup should reflect current expectations for data integrity, electronic records, reproducibility, data sharing, and audit readiness, even if your lab is not formally regulated today.

For research labs, here are some relevant standards and expectations:

  • The NIH Data Management and Sharing Policy, which NIH describes as part of responsible data management and sharing. For NIH-funded labs, this matters because data management plans now influence how scientific data is organized, preserved, shared, and accessed.
  • The FAIR Principles, which focus on making data findable, accessible, interoperable, and reusable. This matters because ELN metadata, sample links, persistent identifiers, controlled vocabularies, and searchable repositories all affect whether research can be reused later.
  • 21 CFR Part 11, which covers electronic records and electronic signatures for FDA-regulated contexts. This matters when electronic lab records, signatures, access controls, and audit trails need to be trustworthy and reliable.
  • FDA's October 2024 guidance on electronic systems, electronic records, and electronic signatures in clinical investigations, which explains how FDA views electronic systems, electronic records, and electronic signatures in clinical investigations.
  • 21 CFR Part 58, which covers Good Laboratory Practice for nonclinical laboratory studies submitted to FDA. It matters for labs generating nonclinical safety data because the rule emphasizes quality and integrity of safety data, SOPs, equipment records, raw data, storage, retrieval, and retention.
  • FDA's Data Integrity and Compliance With Drug CGMP guidance, which is useful for regulated manufacturing and quality environments because FDA expects data to be reliable and accurate.

For a new lab, you don't need to overbuild controls that do not apply. You do, however, need to make conscious choices. If your lab might later support IND-enabling studies, GLP work, GxP manufacturing, clinical investigations, sponsored research, or IP-heavy collaborations, configure the ELN so records can support those expectations before you need them.

How should you structure the ELN for a new lab?

Structure the ELN around how your lab will organize real work: group, project, study, experiment, protocol, sample, storage unit, equipment, and collaborator access. Here's an example from how we implement an ELN at SciSure; we start by defining:

  • Group
    The working environment for the lab or team.
  • Project
    The space where team-based, grant-based, program-based, or product-based work is stored.
  • Study
    A subfolder within a project for related experimental records.
  • Experiment
    The research record itself.

That hierarchy helps a new lab avoid scattered records. Before your team starts creating experiments, decide how the structure should map to daily work. For example:

Project and study structure by lab type

Lab type Project structure Study structure
Academic PI lab Grant, research theme, collaboration, or trainee project Specific aim, manuscript figure set, model system, or assay family
Biotech startup Program, target, product candidate, or platform workflow Screening campaign, validation study, process condition, or assay package
Core facility Service line, customer group, instrument platform, or method Intake batch, project request, run series, or report cycle
Translational team Disease area, cohort, collaboration, or study protocol Sample collection phase, assay phase, analysis batch, or review package

Make sure you choose naming conventions scientists can follow without guessing. A useful name usually includes a project or study ID, a short descriptive label, a date or year where helpful, and owner initials only when ownership matters. (And not, for example, "Version 15_final_FINAL" or "Matt's notebook.")

With SciSure, you can use project and study custom fields to capture context such as grant IDs, material transfer agreements, collaboration agreements, publication identifiers, or DOI information. This makes records easier to find later when you need to support a grant report, manuscript, audit, IP review, or collaborator handoff.

How do you configure inventory and samples before the lab gets busy?

Configure inventory and samples before go-live by defining storage locations, sample types, required metadata, barcodes, and sample search rules.

In a new lab, inventory setup is often treated as a lab-manager task that can wait. That's a mistake if your experiments depend on sample traceability. Once people start writing sample IDs on tubes, creating freezer maps in spreadsheets, and naming aliquots by memory, cleanup gets harder.

Set up inventory in this order:

  1. Define storage units and naming conventions.
  2. Create storage-unit templates for freezers, fridges, shelves, racks, boxes, drawers, or liquid nitrogen storage.
  3. Standardize compartment layers, such as shelf, rack, box, position, tower, or drawer.
  4. Define sample types, such as plasmid, protein, cell line, antibody, compound, tissue, DNA, RNA, environmental sample, control, or reference material.
  5. Add required fields, optional fields, dropdowns, validation rules, and units.
  6. Decide where barcodes or external IDs fit.
  7. Import starting inventory and test search.
  8. Train users to create, move, check, update, and link samples.

With SciSure's Inventory Browser, you can see storage location, storage compartment, sample lists, and sample information in one view. SciSure sample search can use stored sample information across default and custom fields, so you can save and share filter templates for repeat searches such as expired samples, checked-out materials, or a specific sample type in a specific freezer.

SciSure Inventory Management

That's where paperless work becomes practical. If a scientist can find a tube, see its storage location, confirm its metadata, and link it to an experiment, they have a reason to trust the system.

How should you set up templates and protocols?

You should set up templates and protocols by turning your expected recurring workflows into structured records with required sections, linked samples, controlled protocol versions, expected files, and review steps.

Templates are one of the strongest adoption tools in a new lab. They reduce blank-page anxiety and help new team members document work consistently from the beginning.

For each recurring workflow, define:

  • The purpose of the experiment.
  • Required background or hypothesis fields.
  • Required sample, reagent, equipment, and condition fields.
  • Protocol or SOP link.
  • Expected attachments, such as microscopy images, instrument exports, analysis files, spreadsheets, or scripts.
  • Results and interpretation sections.
  • Review, signing, witnessing, or approval rules.
  • Metadata needed for search, reporting, or publication later.

With SciSure, you can create experiment templates from scratch or created from an existing experiment. That matters for a new lab because your first well-structured experiments can become reusable templates. You can refine the first few strong records, remove one-off details, and turn them into the standard workflow for the team.

SciSure experimental template

You should also treat protocols as controlled research assets. A new team member should know which protocol version to use, what fields are required, who can update the protocol, and whether review or signature is needed before a protocol becomes active.

This is where reproducibility becomes concrete. A scientist can follow a current protocol, link the correct sample, capture the right conditions, attach the expected files, and create a record another person can understand months later.

SciSure
Planning the digital foundation for a new lab?
Talk to a SciSure specialist about implementation planning, ELN/LIMS structure, sample traceability, and user training before your first major study begins.
Request a demo

How should permissions, signatures, and audit trails be configured?

Configure permissions, signatures, and audit trails before broad rollout so scientists know what they can do, managers can protect shared records, and reviewers can trust completed work.

Permissions are part of lab design. If everyone can edit everything, data integrity suffers. If permissions are too restrictive, adoption suffers. A new lab needs a model that fits how work happens.

Here's what a practical permissions model should define:

  • Who can create, edit, delete, archive, or restore experiments.
  • Who can create or edit templates.
  • Who can create, update, move, or archive samples.
  • Who can manage storage units, sample types, and equipment.
  • Who can publish or update protocols.
  • Who can review, sign, or witness records.
  • Who can view sensitive projects, confidential collaborations, or IP-relevant work.
  • How records remain accessible when trainees, contractors, or employees leave.

With SciSure, you can sign experiments and lock them into read-only mode with a visible digital signature and timestamp. If you enable witness signing, a witness can approve and sign, or decline and unlock the record with a note so the creator can adjust and resubmit. SciSure sample audit trails show who changed sample information, when the change was made, and what data was modified.

SciSure ELN witness signing

For identity and access management, SciSure also supports SAML single sign-on in supported configurations, including Microsoft Entra ID, AD FS, Okta, OneLogin, Keycloak, and SimpleSAMLphp.

Even if your lab is not regulated, these controls help answer the same practical question: can your team trust the record later?

What should the first 90 days of ELN implementation look like?

Your first 90 days should move from design to configuration to active adoption, with a small number of workflows fully working before the lab scales.

First 90 days of ELN Implementation in a new lab

Timeline What to complete
Days 1–30 Name implementation owners, define the lab structure, choose priority workflows, draft naming conventions, define sample types, identify required metadata, and choose key users
Days 31–60 Configure groups, projects, studies, templates, protocols, storage units, sample types, permissions, signatures if needed, and initial inventory
Days 61–90 Train users through real tasks, run pilot experiments, test sample search, review completed records, collect friction points, update templates, and retire duplicate paper or spreadsheet steps

Make sure to stick to specific success metrics. For example:

  • Number of active users creating complete experiment records.
  • Number of recurring workflows converted into templates.
  • Percentage of priority samples with required metadata and storage location.
  • Number of protocols under version control.
  • Average time to find a sample, protocol, or prior experiment.
  • Number of support issues by category, such as permissions, templates, inventory, training, or search.
  • Percentage of completed records reviewed, signed, witnessed, or archived according to policy.
  • Number of side spreadsheets or paper forms retired.

If your scientists are still maintaining those "sneaky" side spreadsheets even after go-live, treat it as evidence. Ask what the spreadsheet does that the ELN workflow does not yet do: a missing field, report, filter, batch update, label workflow, permission, or habit.

How can SciSure's implementation process support a new lab?

SciSure can support a new lab through onboarding, implementation planning, technical implementation, data migration, user training, support resources, and ongoing customer success. Our Customer Success roadmap includes an implementation path that starts with assembling a project team, creating a project plan, setting clear milestones, appointing key users, and creating a training schedule. For private cloud and on-premises examples, this also includes technical implementation, optional test migration on an acceptance environment, migration to the new environment, and training for key users, group administrators, and end users.

A solid implementation process matters because a new lab needs more than software access. Your team needs to learn how to complete actual research work in the system. Like for example, how to:

  • Create an experiment from a template.
  • Link a sample and record where it is stored.
  • Use the active protocol version.
  • Attach a microscopy image, instrument output, spreadsheet, or analysis file.
  • Search for prior work.
  • Update sample metadata.
  • Request review.
  • Sign or witness where required.
  • Retrieve the record for a grant report, publication, IP review, audit, or collaboration.

With SciSure, the implementation process can help connect these decisions across ELN, LIMS, samples, inventory, protocols, permissions, signatures, audit trails, integrations, support resources, and training. The software matters, but the implementation process is what turns the software into a working lab system.

What does a successful new-lab implementation look like in practice?

A successful new-lab implementation looks like a team that can onboard new researchers quickly, keep experiments consistent, trace samples and protocols, and find records without relying on paper notebooks or memory. For example, Dr. Ana Paula Piovezan Fugolin implemented SciSure immediately when founding the lab, so the team started with connected data, protocols, and inventory rather than trying to retrofit structure later.

That mattered because the OHSU Fugolin Lab operates in a multidisciplinary, training-rich academic environment with postdoctoral fellows, graduate students, dental students, and research staff. The lab needed a way to keep experimental data, chemical batches, protocols, images, and results accessible and traceable as people joined, trained, and collaborated.

In a nutshell: when a new lab starts with a structured ELN and inventory system, onboarding becomes part of the workflow. New trainees can follow standardized protocols, find prior work, understand what was done and by whom, and avoid depending on informal handoffs.

Likewise, Food Brewer's story shows what can happen when a growth-stage research organization builds digital infrastructure early. Food Brewer selected SciSure as its digital lab platform and began implementation with standardized naming conventions, project and experiment hierarchy, comprehensive barcoding, sample traceability, automation, and data integration. The company reported a 60% productivity increase in R&D and a 40% productivity increase in upstream processing, along with faster onboarding and stronger regulatory and IP documentation.

Food Brewer: R&D and Upstream Processing at Scale
Customer outcomes

Food Brewer: R&D and Upstream Processing at Scale

Less manual tracking, full sample traceability, and automation that scaled cultivated cocoa research from tissue selection to 2,500-liter bioreactors.

After implementing SciSure to unify data, samples, and processes:

40%-60% productivity gains

  • R&D productivity up 60%
  • Upstream processing up 40%
  • Full traceability across cultures, chemicals, and equipment
  • Faster onboarding and stronger regulatory and intellectual property documentation

Sources

SciSure customer story: Food Brewer, "Food Brewer scales cultivated cocoa research with SciSure." Metrics are condensed from that story.

These examples point to the same implementation principle: the highest-value ELN setup helps scientists do real work consistently, find information quickly, and trust the record later.

How do you train users without slowing down the lab?

Train users by role and workflow so each person learns how to complete the work they already need to do. New labs often onboard people in waves: the PI or lab head, early lab manager, first scientists, trainees, contractors, collaborators, and later operations or QA stakeholders. Each group needs a different training path.

Here are some hands-on scenarios to help you get an idea of where to begin:

  • A scientist creates an experiment from a template, links samples, attaches data, and submits the record for review.
  • A lab manager adds a sample type, creates storage locations, imports samples, prints or applies labels, and verifies search filters.
  • A reviewer checks an experiment, confirms protocol version and attachments, and signs or witnesses if required.
  • An admin adds a user, assigns permissions, and confirms the user can access the right projects and samples.
  • A key user collects questions, identifies missing fields or confusing templates, and updates the rollout plan.

Keep training close to the pilot workflow. A cell culture team might practice passage records, freezer locations, media lots, contamination checks, and protocol versions. A protein engineering team might practice construct documentation, plasmid links, sequencing files, assay attachments, and review steps. A core facility might practice sample intake, storage assignment, status updates, and report retrieval.

Adoption improves when the first training session feels like doing real work, not watching a software tour.

How do you know your new lab's ELN implementation is working?

Your ELN implementation is working when scientists use the system for active work, samples are searchable, protocols are controlled, records are reviewable, and paper or spreadsheet workarounds start disappearing. Look out for signs like these:

  • Your scientists are creating new experiments from templates instead of blank pages or copied Word files.
  • You can search for samples by ID, sample type, owner, storage location, barcode, or custom metadata.
  • You can reuse protocols from controlled versions rather than copied from old PDFs.
  • You can attach expected images, instrument files, analysis files, and notes in the record.
  • Reviewers can see who changed what, when, and why.
  • New team members can follow a workflow without needing a private walkthrough from one person.
  • Lab managers can answer inventory questions without opening separate freezer maps.
  • PIs or project leads can find enough context to understand progress across projects.
  • Compliance, QA, grant, or IP stakeholders can retrieve evidence without reconstructing the story from email.

The best sign is ordinary confidence. A scientist knows where to record work. A lab manager knows where materials are. A reviewer can trust the history. A new teammate can learn the workflow without inheriting a pile of paper and guesses.

SciSure
Ready to build a paperless lab your team can actually use?
With SciSure, you can connect ELN, LIMS, inventory, protocols, permissions, signatures, and audit trails, so your lab starts with structured, searchable workflows from day one.
Request a demo

FAQ: implementing an ELN in a new lab

Should a new lab implement an ELN before hiring the full team?

Yes, if you can. Implementing the ELN early lets the first users define structure, templates, sample types, storage locations, and permissions before the lab grows. You can refine the setup as the team expands, but the foundation should be in place before recordkeeping habits become scattered.

What should a new lab configure first?

Start with the lab hierarchy, naming conventions, permissions, priority workflows, experiment templates, protocols, sample types, storage units, and required metadata. If your research depends on samples, configure inventory before experiments begin.

How do you avoid making the ELN too complicated?

Start with the workflows that happen every week. Keep required fields focused on the metadata people actually need to find, repeat, review, or report the work. Add complexity only when it solves a real traceability, compliance, or retrieval problem.

When can a lab stop using paper notebooks?

A lab can stop using paper notebooks once the ELN workflow is approved, users are trained, records are complete, review or signature needs are covered, and paper is no longer needed as the authoritative record under the lab's policy. Regulated or institutionally governed labs should confirm this with QA, legal, compliance, or research administration.

What is the biggest risk when going paperless?

The biggest risk is losing context. A digital note is weak if it is separated from the sample, protocol version, file attachment, reviewer, timestamp, storage location, or decision trail that explains the work.

Who should own ELN implementation in a new lab?

Use a small implementation team. Include the PI or scientific lead, lab manager or lab operations owner, IT or systems owner, QA or compliance stakeholder if relevant, and key users who understand daily bench work.

How do you encourage scientists to adopt the ELN?

Give scientists templates that match their work, make sample lookup easier, train through real experiments, respond quickly to friction, and remove duplicate paper or spreadsheet steps once the ELN workflow works. Adoption improves when the system saves time or reduces confusion in the work people already do.

How should a new lab measure ELN success?

Track active users, completed experiments, template usage, searchable samples, protocol reuse, support questions, review or signature completion, time to find records, and the number of retired side spreadsheets or paper forms.

If you're building a new lab, your ELN implementation is one of the earliest operational decisions that will shape how your science gets recorded, found, repeated, reviewed, and trusted. The sooner you define the structure, the easier it is to build a paperless lab that scientists will actually use.

If this sounds like the kind of lab you'd like to build, get in touch with us and let's get those first 90 days going.

Read More:

About the author:

Apsara Ghising

Apsara Ghising is an Implementation Specialist at SciSure, where she guides new labs through onboarding and setup. She joined eLabNext, now part of SciSure, in 2023 and has spent more than three years working directly with research teams, first in customer success and now in implementation. Before moving into lab software, she worked in patient care as a surgical assistant, cardiac stress technician, and medical coordinator. She holds a Bachelor of Science in Biology from the University of Hartford.

See all posts from this author

Melde dich für unseren Newsletter an

Holen Sie sich die neuesten Tipps, Artikel und exklusiven Inhalte zum modernen Labormanagement in Ihren Posteingang.
Danke! Deine Einreichung ist eingegangen!
Please check your email to verify your submission.
Hoppla! Beim Absenden des Formulars ist etwas schief gelaufen.